
Each Google Slide has a unique URL which opens up a whole world of possibilities for creating with this versatile tool. Here are some ideas for using slide-to-slide linking activities in the classroom.

Google Slides is WAY more than a slide presentation tool. On the Google Teacher Tribe podcast, co-host Kasey Bell and I like to call it the “Swiss Army knife of G Suite.”
You can use it to …
- Create stop-motion animation
- Make a collaborative workspace for your class
- Brainstorm with sticky notes
- Plan lessons digitally
- Create an Instagram Stories and Snapchat experience for learning
One lesser-known feature of Google Slides can open up a world of awesome, effective learning opportunities …
Linking from slide to slide.
By using this feature, you — and your students! — can create interactive learning that sticks.
How does it work?
Linking from one slide to another is as easy as creating a link to a website.
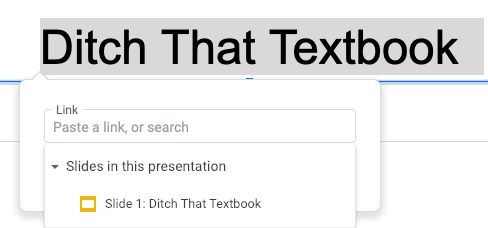
- Click on or highlight what you want to create a link on. (Some text, an image, a shape …)
- Use the link button (looks like chain links)
- Choose the dropdown menu that says “Slides in this presentation”
- Select the slide you want to link to
Sounds pretty easy, right?
It opens up a WORLD of possibility.
How to plan it all out
Getting your ideas all sorted out is an important part of these activities. If you have a good plan in place before starting, it makes everything easier.
Thankfully, creating a plan — for students and for teachers — is pretty easy. My example below was done in a Google Drawing, but it’s just as easy to plot this out on … gasp! … a sheet of paper. (Paper is still a valuable tool in the classroom!)

Here are the steps to planning these activities out:
1. Start with your first slide. It establishes the activity, sets the scene, etc. (“It’s lunchtime.”)
2. Decide what the options are the reader will have. (“Yes” or “No”.)
3. Identify what you’ll put on the slide where they go next. (“Where do you want to eat lunch?” and “You have some free time.”)
4. Identify the choices they’ll have on those slides. (“Home,” “Out,” “Book,” “Run”.)
5. Repeat steps 3 and 4 over and over until you’re done.
6. Number each of the slides on your planning page. (You’ll use those as the slide numbers in your slide presentation. It’ll also help you link the slides together later.
Here’s what it might look like when complete:
The example above is simple: Choice between two on the first question/slide, then choice between two on the second question/slide. It leads to four possible solutions.
It can go deeper and stay just as symmetrical (i.e. another round of questions with two choices).
Each question/slide can have more options (i.e. three or four possible choices).
It can look more like a line and less like a pyramid (i.e. each question/slide has a “right” answer and choosing the wrong answer leads to a “the end” slide).
How to use slide-to-slide linking in Google Slides
The interactivity that comes with this can be so much fun — and create a memorable learning experience.
Here are some activities you can do in your classroom (or professional development session) that use slide-to-slide linking:
1. Choose Your Own Adventure stories — Remember the books where you made choices and turned to the page that corresponded to that choice? Google Slides creates that same kind of experience. Students can use it for making up their own stories. They can do collaborative writing where they create the story together.
2. Yes/No with feedback — Think of this as a simple interactive lesson. Use the slides to ask students questions. When they click to answer, they get a slide that says they’re right (with some encouragement) or they’re wrong (with feedback on how to improve). You can add as many rounds of questions as you’d like.
3. A text message conversation — Use a fake text messaging site like iFake Text Message. Create the beginning of a conversation (between characters, between student/teacher, between students). Let the student choose what to say next. Create the next part of the message with a fake text message. Continue on and on.
4. Choose from an image — Instead of using text to tell a story, tell it with images. Put an image on your slide. Then make the clickable part a description of what the student would choose to do. (i.e. A picture of a cave and a hill. One choice is “go in the cave” and one is “go up the hill.”)
5. Create a new ending — This is great when you’re studying a story, events in history … anything that has a beginning, middle and end. Describe part of the beginning of the story and give options. One option should be the “right” answer (the one in the story you studied). Others are alternative endings. This encourages students to think deeply about the characters and how they would respond in different situations.
6. Stations/centers — Have several activities you want students to cycle through? Create a master slide with the names of all of the activities. (Maybe a map of the room made with shapes showing where all the activities are.) Make a link from each activity to a slide with instructions or a prompt where students type their answers on the slide. On each activity slide, include a link back to the master slide with the chart of the room.
For notifications of new Ditch That Textbook content and helpful links:
- like Ditch That Textbook on Facebook
- follow @jmattmiller on Twitter
- check out the #DitchBook community on Twitter
- follow Ditch That Textbook on Pinterest
- subscribe to the Ditch That Textbook YouTube channel!
Interested in having Matt present at your event or school? Contact him by e-mail!
Matt is scheduled to present at the following upcoming events:
[getnoticed-event-table scope=”upcoming” max=”15″ expanding=”false”]

[…] Get more ideas here: Slides Superpowers: Engaging slide-to-slide linking activities […]