")
Comic strips captivated us as children. Tap into that energy in the classroom with Google Drawings comic strips! Here’s how. (Icons via TheNounProject.com with a NounPro account.)
This post is co-authored by Ditch That Textbook’s Matt Miller and Cori Orlando, a teacher on special assignment (TOSA) from Simi Valley, California. Find her blog, Leading in Limbo, at leadinginlimbo.weebly.com.
We (Cori and Matt) are betting that comics are a memorable part of your childhood, whether they were the color comic strips in the Sunday newspaper or comic books.
If not, then it was probably animated comics — cartoons!
They’re visual. They’re colorful. Adults and children alike flock to animated movies at theaters when they’re released.
There’s a draw that comics have on our lives. Graphic novels and comics draw in reluctant readers, and making comics taps into our students’ creative side.
Quinn Rollins writes this about comics in his book, Play Like a PIRATE:
It’s funny that we endorse combining pictures with words as a good way to tell stories to young children, but as they get older, we want children to abandon their picture books. I’d argue the things we valued as children still have value for us as adults — and at every age in between.
Comics in the classroom
There is power in students having to go through the creative process. They need to synthesize their thinking in order to produce. Higher level thinking occurs when students create a non-linguistic representation of their ideas.
Plus, it lets students tap into their inner creativity — which is a fun and even effective practice in the classroom. Letting students pursue their creativity not only increases students’ engagement in class but also empowers them to take ownership of their learning.
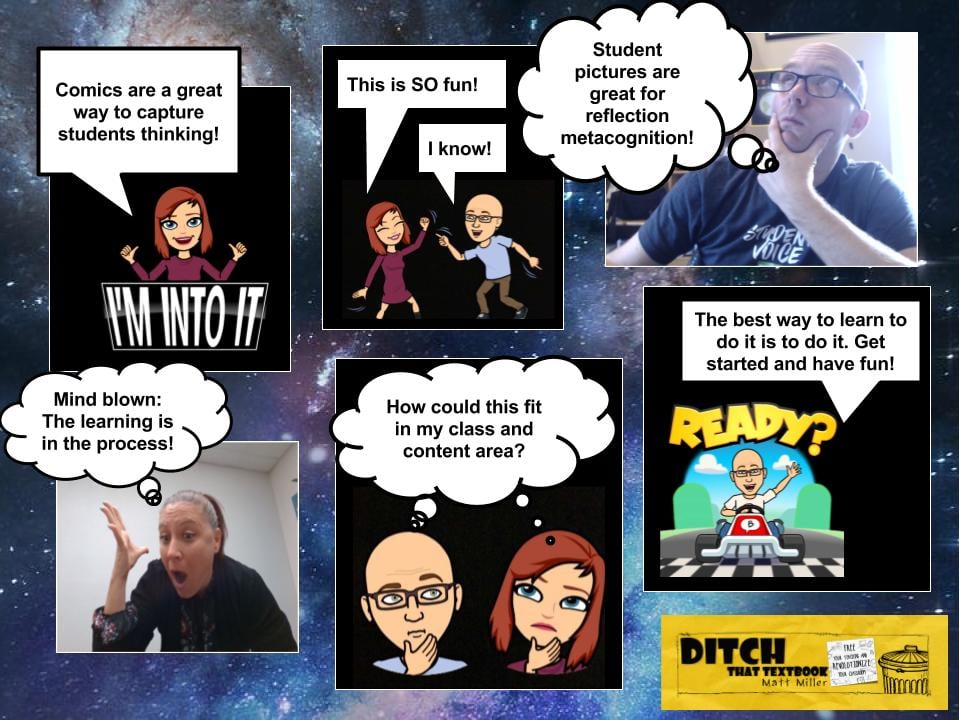
Here’s an example of what a comic strip in Google Slides or Drawings could look like! Click here to see the original Google Drawing file. (Feel free to File > Make a copy … but please don’t ask for editing rights!)
Google + comics = greatness!
Google Drawings and Slides is a great medium for giving students this creative outlet. It lets them create a framework with shapes, add speech/thought bubbles, and insert images in one place.
- Use Google Drawings if you want your comics to be on a single image. (Think of it like a digital sheet of paper or a poster board.)
- Use Google Slides if you want multiple pages. (Think of the slides like the pages of a comic book.) I (Cori) LOVE using Google Slides with students because they have access to the “explore button”. It is a quick way for students to find images (rather than having to open a new tab).
Here’s a quick walk-through of how we’d get started making comic strips in Drawings or Slides …
Step 1: Set up the framework of the comic
You can create a four-panel comic strip as simply as with two lines (horizontal and vertical) to divide it into four equal sections. Here’s a template so you can see it.
PRO TIP: Hold in the “shift” key while drawing lines to make them perfectly horizontal or vertical.
You can resize your Google Drawings or Slides to make them wide like traditional newspaper comic strips. Go to File > Page setup > Custom. Choose the size you’d like. In this template, I made it 8 inches wide and 3 inches tall.
PRO TIP: Draw a rectangle. Copy/paste it as many times as you need it. Arrange them next to each other with equal spacing in between. Then highlight all four rectangles and resize them at the same time to fit the page! (See image at right.)
If you’re feeling brave, really mix it up! Here’s one I (Cori) created where the panels aren’t anywhere near the same size! The first slide has drag and drop speech bubbles and callouts that might assist your students in getting started.
Step 2: Add images
You have SO MANY options for adding images to your comics! Here are some of our favorites:
- Take your own pictures and let students be the stars of the comics! This is one of my (Matt) favorite ways to personalize comics with students. Use the Alice Keeler Webcam Snapshot Chrome extension to take a webcam picture. When it saves to Drive, just insert it into your comic from Drive. They can pose, dress up in character, bring in props, etc.
- Find your favorite of these Creative Commons or public domain image sources: Unsplash, Creative Commons search, Pixabay and more. (If you have a favorite that didn’t make the list, add it in a comment at the bottom of this post!)
- Use Bitmojis! They’re these fun cartoon versions of yourself. Go to bitmoji.com and set yours up. Add the Chrome extension to your Google Chrome web browser and drag them right on the page.
- NOTE: Some Bitmojis images aren’t appropriate for younger students. An alternative: create some Bitmoji images ahead of time and save them to a folder in Google Drive (open the folder in your web browser and drag the Bitmoji images there … or save them to your device and upload them to the folder). Then share the folder with students.
- Add icons from The Noun Project (thenounproject.com). These icons can add to what you’re creating in your comic — or serve as props or extras for your characters! If you’re using the free Creative Commons version, be sure to put a little attribution text box somewhere in your work.
Step 3: Polish it off
Add a background behind the panels to make it pop. Use images as the background (can use Creative Commons images through Google search inside of Drawings) or just use a color or a texture … whatever! Choosing a background gives students another opportunity to decide and justify that decision.
Add speech bubbles, thought bubbles and narration using the shapes tools. Speaking or thinking for a character is also higher-level thinking. Students must know a lot about their topic to be able to put themselves in another person’s shoes and think for them!
Create one page with Drawings. Create multiple pages with Drawings. Or create a whole comic book by designing them on separate slides in a Google Slides presentation! Then download as a PDF (digital comic book) or embed in a webpage.
Extra: Add a layer of deeper thinking with collaboration
Many teachers think that a classroom with less than one device for one student is a disadvantage.
In fact, it can bring out a learning environment that wouldn’t exist if each student was working 1:1.
Here are some of the benefits of pairing students up with a partner on just one device:
- Have students work on a comic strip in pairs. In addition to the product they create (the comic strip), the conversations they have and decisions they make together can be more productive than if they did it by themselves.
- Paired work on comic strips has great benefits for the teacher, too. It frees you up to circulate around the room and eavesdrop on student discussions. It gives you the chance to see into their thinking (which is a form of assessment!). Plus, you can always stop and redirect and ask leading questions if necessary.
- This set-up also promotes the student-centered classroom. Students can get started right away and work independently, letting them really own the learning.
By giving students a chance to explain their thinking, it kicks the level of critical thinking up a notch. Justifying your thinking is a higher level on Webb’s Depth of Knowledge. Students can explain their creative decision making, from the background, to the expression on their faces in the selfies they took and the dialogue that they chose. This promotes metacognition, where students are thinking about their thinking.
You can add an additional layer of deeper thinking by letting students create a screencast video to explain their comic. Using a free screen recording tool like Screencastify (screencastify.com), students can display their comic and justify what’s in it and its significance. This lets them practice their skills in video creation and amplifies their voice.
How could comic strips fit what you do in the classroom? If you’ve used them before, what suggestions do you have? Please share them in a comment below!
For notifications of new Ditch That Textbook content and helpful links:
Are you looking for quality, meaningful professional learning that both equips and inspires teachers?

Matt provides in-person and virtual keynotes, workshops and breakout sessions that equip, inspire and encourage teachers to create change in their classrooms. Teachers leave with loads of resources. They participate. They laugh. They see tech use and teaching in a new light. Click the link below to contact us and learn how you can bring Matt to your school or district!
Is Matt presenting near you soon? Check out his upcoming live events!

I am unable to access the comic strip (Click here to see the original Google Drawing file.)
“Click here to see the original Google Drawing file” – not working. Can you correct or send?
I cannot click on the blue text for the google draw template. Help?