
What will make your lesson plan book feel a Swiss Army knife? The answer is printable templates! Here are 3 templates plus directions on how to make your own.
If you’ve ever bought a lesson plan book, you’ve probably flipped through it and looked at all the extra pages at the beginning and the end. Many times, I’ve thought, “Wow. All of these extra pages and I can’t use a single one of them!”
Having some places for big-picture planning and tracking data can be really helpful. But, sadly, many of the lesson plan book designers just don’t get what we really need — or there’s no way for them to know because we have very unique, specific needs.
Instead of relying on those pre-created pages, let’s make some of our own!
Before we look at the templates I’ve created for you, let’s take a look at how they can be added to your lesson plan book. There are a few logical places.
1. The front cover. With many lesson plan books, the cover is laminated or plastic. That makes it really easy to tape a template inside it and remove it without damaging the lesson plan book or the template. Plus, if you tape your template to the edge of your lesson plan book, you can fold it in and out — kind of like a pocket knife, right?
2. Any of those pre-created pages that you’ll never use. Or sometimes there are notes pages at the end of the lesson plan book. Just tape your template page over one of those pages.
3. Tape it to the edge of your weekly lesson plan pages. Do you ever feel like you don’t have enough space for everything you need? By taping in a narrow template — or even a blank strip of paper — you can add extra real estate to your lesson plan book.
And these are certainly not the only options. Let your creativity and imagination run wild with ideas of your own!
OK, let’s get down to the templates. What are some that could be useful?
The yearly planning template.
 In this template, you can see every single day of the year. It doesn’t give you lots of space for each day, but you can make the most of the space you have with an icon or an abbreviation like we saw in video 1. You could also use a color coding, shading a part or all of the space with a color that stands for something. Being able to see the whole year at a glance can be really, really helpful.
A semester planner.
 It has the weeks of the semester along the left side and specific tasks or items along the bottom. You can identify the task or item on the bottom and then mark when it happens in each week. This can help you plan out an entire semester ahead of time, or it can be a way to track things that happen throughout the semester. Again, icons and abbreviations and coloring can make this a wealth of information in one glance.
A monthly habit tracker.
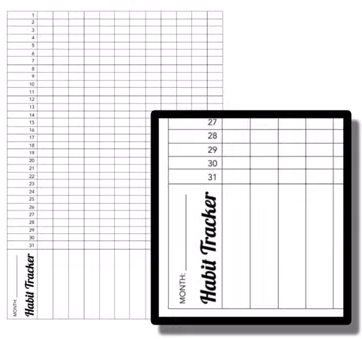 These habit trackers are really popular in bullet journal circles. This one works a lot like the semester planner. It has the days of the month along the left and spaces for your habits along the bottom. Use it for things you want to track in the classroom — or you can use it for personal things, like any morning habits, exercise, nutrition, cups of coffee consumed in the month, anything!
You can get all of these templates for free! Just go to ditchthattextbook.com/lessonplanner to find a place to download and print them. Cut them down to size if you need to. Tape them into your lesson planner if you’d like. And feel free to share them with others!
If these templates don’t quite fit your needs, don’t worry!
It’s really, really easy to create your own templates. They don’t have to be fancy or pretty or Pinterest worthy. If they have spaces for the information you need and help you stay organized, they’ll do the job! I created these templates on Google Slides.
Yep, Google Slides.
 You don’t have to use it for presentation slides to speak to a group. In Google Slides, you can go to File – Page setup and select the “custom” setting to resize your slides to paper size.
With a standard paper-sized lesson plan book, the pages are 8.5 inches by 11 inches. In that case, I sized my templates to be 7 inches wide instead of 8.5 because it gives a little extra space so your templates aren’t overlapping the spiral binding in the middle. You can make yours whatever size suits you best, but I’ve found that 7 inches is large enough size that isn’t too bulky to be taped in.
When you’re finished, just print your template and you’re set! And, of course, if you’re into digital lesson planning, creating and using these templates digitally is easy — and all you have to do is copy your files digitally to get more of them!
And now, it’s your turn. Which of these templates is most useful? How could you use them? If you created a template, what would it have in it? And if you have created one, tell us about it! Please leave a comment below.
NOW AVAILABLE: The Ditch That Textbook Lesson Plan Book combines a flexible design with TONS of resources to level up your lesson plan game.
- CUSTOMIZABLE LAYOUT – Divide your pages into 3, 4 or 5-day weeks
- BULLET JOURNAL INSPIRED – Space for weekend events and to-do lists
- REFERENCE PAGES – Helpful lesson planning tools and resources
- DIGITAL TOOLS HIGHLIGHT – Discover new tools every week
- WEEKLY GOAL AND REFLECTION – Don’t lose track of your “why’s”
- NEW TEACHING IDEAS – Get weekly ideas from Ditch That Textbook
- PLENTY OF SPACE – Features 128 pages, 40 undated weeks and 6 subjects
Click here to get your DTT Lesson Plan Book!
For notifications of new Ditch That Textbook content and helpful links:
- like Ditch That Textbook on Facebook
- follow @jmattmiller on Twitter
- check out the #DitchBook community on Twitter
- follow Ditch That Textbook on Pinterest
- subscribe to the Ditch That Textbook YouTube channel!
Interested in having Matt present at your event or school? Contact him by e-mail!
Matt is scheduled to present at the following upcoming events:
[getnoticed-event-table scope=”upcoming” max=”15″ expanding=”false”]
