
Take the hassle out of lesson planning. Go digital. Make your plans searchable and shareable. Use Google Forms!
Traditional lesson plan books have their limitations. Being paper-based, they’re not searchable and they’re not easily shareable.
Wouldn’t it be great to be able to search quickly for a specific lesson plan instead of flipping back page by page?
How about being able to share lesson plans with others without making photocopies?
You can use Google Forms to create a lesson planner that creates documents — automatically! — with all your plans in a format nicely designed by you!
Invest a bit of time now (I’m guessing +/- 30 minutes … just my best guess) and you’ll have a system that saves your lesson plans to your Drive that you can find easily later.
You’ll create a Google Form like this one (click here) where you’ll type up your lesson plans.
With the steps in this post, you’ll automatically create documents with all of your data like this (click here)!`
I published a post called “20 practical ways to use Google Forms in class, school”. My readers — by far! — clicked most often on the “lesson plans” option. This made me think, “Why not create specific instructions so everyone knows EXACTLY how to do this?”
Here it is … step-by-step instructions to add automation to your Googlized lesson plans:
1. Create a new Google Form (on a computer/Chromebook, go to Google Drive and use the “NEW” button … hover over “More” and choose Google Forms). Change the title/filename to whatever you’d like. (Something like “Lesson plan template”.)
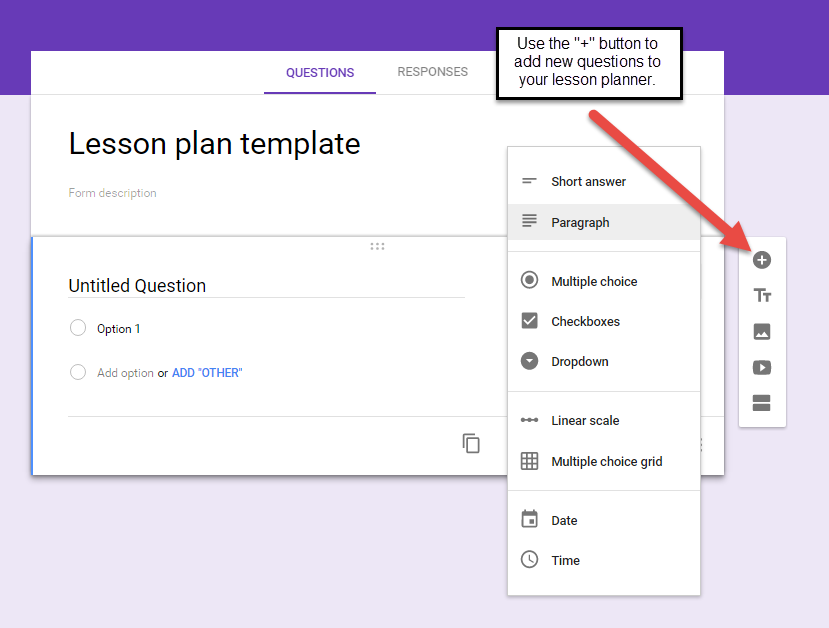 2. Add questions using the circle “+” button to create places to add information to your form. This is how you’ll build your lesson planner. Some suggestions (and the type of question to use):
3. Click the preview button (looks like an eye on computer/Chromebook) to make sure everything looks good. If so, fill your lesson plan template out once with some practice text (so you’ll have some data to work with) and submit it.
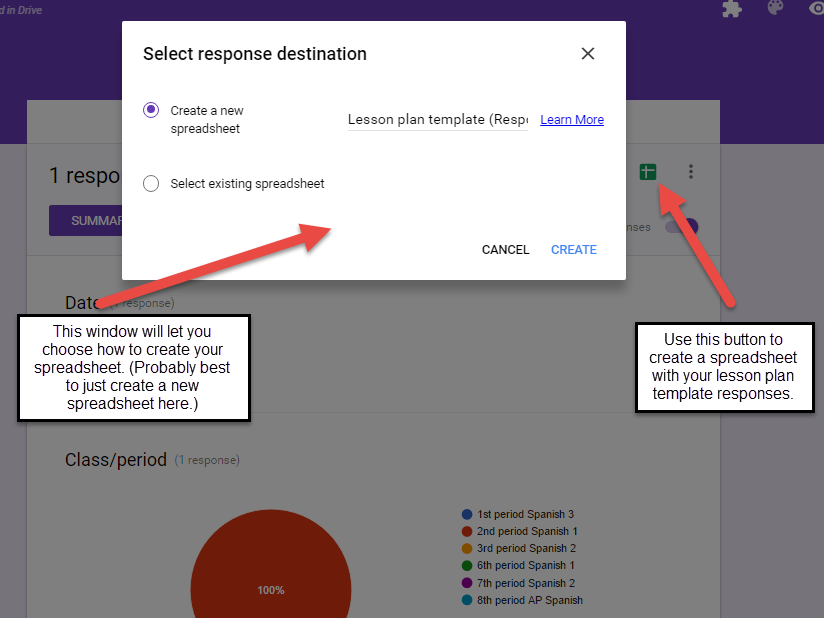 4. Go back to your Google Form. Click the “Responses” tab (it’s next to the “Questions” tab at the top). Click the green spreadsheet button to create a spreadsheet. In the window that pops up, choose to create a new spreadsheet. (If it doesn’t have a file name yet, you might want to create one so you can find it later!)
5. It will open the new spreadsheet for you, where you’ll see any lesson plan responses you’ve created. (Whenever you type up new lesson plans and click “submit,” they’ll come to this spreadsheet automatically too.)
6. Now that our lesson plan spreadsheet is set, let’s set up what the document will look like with all of your lesson plan information! Go back to Google Drive and create a new document. Design that document just like you’d like it to be. (Here’s an example … click here to see it … and don’t worry about all the <<>> stuff in the document yet.)
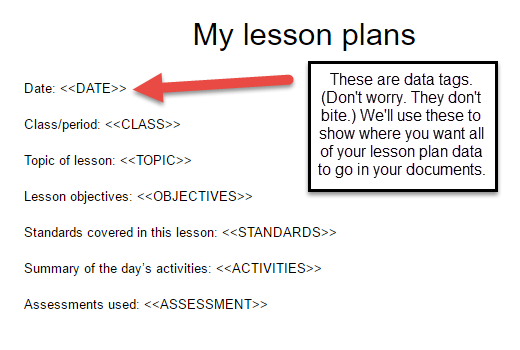 7. Now, let’s set the document up to have information inserted into it. In the example document above, you’ll see data tags that have << and >> around them. (If the term “data tags” scares you a little bit, don’t worry … be brave and keep going. They aren’t as scary as they sound. I promise! 🙂 )
For us to be able to bring in all of your lesson plan data, we have to know where to put all of that data. These data tags do it for us. The nice thing about them — you can make them whatever you want (I’d stick to regular alphabet letters to be safe, though). They just need to have << and >> around them.
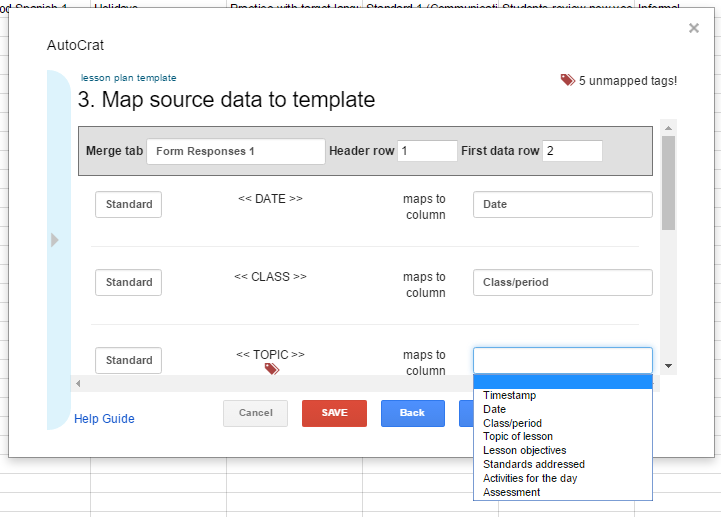
8. Once your data tags are in place, it’s time to set this whole thing up so it will generate those awesome lesson plan documents for you! Go back to your results spreadsheet and click the “Add-ons” menu. Then click “Get add-ons …”. Search for “autoCrat” and click the blue “+ FREE” button next to it. You’ll need to grant it permissions to do its thing. (Don’t worry … it’s safe.)
9. When the autoCrat add-on is installed, do one of two things (they both do the same thing):
 Go through the step-by-step directions for autoCrat:
If you clicked that “play” button in autoCrat … Quick! Run to Google Drive and check your lesson plan folder. There will be a new lesson plan document in it!
Pretty snazzy, huh?
Now, every time you enter lesson plan data into your Google Form, autoCrat will create a document with all that information, sorted and presented neatly in that document you created.
(Note: autoCrat will automatically create those documents about every three hours or so by itself. If you want them immediately, you can go click that “play” button at the end of the autoCrat instructions above.)
Want to share specific lesson plans with colleagues or supervisors? Use the blue “Share” button in the top right of the document and share it with them … or share the whole folder with them!
Want to find lesson plans for a specific date or with a specific activity in them? Just search Google Drive for the document!
Autocrat creates separate documents for each lesson plan you create with the Google Form. I’ve had questions about putting all of those lesson plans together in one document.
After doing some digging, here’s what I’ve got …
For notifications of new Ditch That Textbook content and helpful links:
Interested in having Matt present at your event or school? Contact him by e-mail!
Matt is scheduled to present at the following upcoming events:
[getnoticed-event-table scope=”upcoming” max=”15″ expanding=”false”]
Session expired
Please log in again. The login page will open in a new tab. After logging in you can close it and return to this page.
I like the sign in/out form.
Excellent
Hi Kath,
You might be able to pull this off within Microsoft using their forms, word and Power Automate, but it has been over a year since I used it and I found it clunkier than Autocrat.
I love the idea but not seeing my folders. I am stuck on step 6 and not sure where to put the link for the form. I created another column with the form ID. How do I complete step 6?
I am getting an error for delivery into the Google Folder.
I just followed this and it worked PERFECTLY! I am converting the Google Response spreadsheet to another sheet that I have set up with various boxes so it looks nice. It took some time to set everything up, but I was able to do the SECOND lesson plan in under 10 minutes. AMAZING! Thank you!!
Thank you. I am looking forward to using this.
I just followed all of the steps. However, my docs are not being created into the folder I selected.
Matt, I just followed your step by step instructions. Now I can’t seem to enter any more information for another lesson plan for another class. It says “this form is no longer accepting responses.” What did I do wrong??
Thanks for all you do!
Amy
Can’t figure out how to get AutoCrat to dump to folders in Google Drive because you need folder IDs, not folder names. I wanted to tied final folder to a dropdown that is man-readable (like period # or subject). What I need is a way to have Google Forms translate a dropdown pick into a correlated value.
I haven’t filtered through all of the comments to see if someone’s already told you, but AutoCrat has updated their options, so you *can* get separate form responses to go in the same document. I haven’t explored all of the options within it because I prefer mine one to a page, but it’s there now.
can you share your plan with me? i need a visual or a sample to see what it actually looks like before i go through all the steps myself. i can be reached–> janehighley at gmail…
Thanks.
There is an amazing google add on called docAppender. This will help you consolidate all of your lessons into one doc for each course/subject you are planning for.
Where has this been all me life? Many thanks for the great work and the tremendously helpful post. I owe you a cup of coffee.
This is an awesome idea! I find that this is key for teams that take turns completing lesson plans weekly. Do you mind if I sure my thoughts for this in my blog, mrswelchknows.blogspot.com?
Hi Andrew —
I think I know what happened. When you’re adding tags to the title of a document, be sure to use the tags from the little vertical teal arrow bar on the left and not from the document. I had that same trouble when I created my first documents. Those tags are often a bit different from the ones in your document. Be careful … they’re caps sensitive too! Easiest to just copy them over instead of retyping them.
I love this!!! I just created 2 plans. Going to see how it looks to create a week at a time.
I must have missed a step somewhere. On Step four of the AutoCrat I have added the <> tag in hopes the new file will contain the Lesson Title. However when the new Doc is created it has the carrots <> in the file name. Any idea what I might have missed?
Otherwise, this is great. I used the old Intel Teach to the Future lesson plan for my guide.
Hi Lisa! Sounds like you’ve made great progress!
If you have worked through all of the Autocrat steps in the post, here’s what you do next …
1. Open the Google Form with the lesson plan stuff (date, class, activities, standards, etc.)
2. Click the “preview” button (looks like an eye)
3. Fill out the form and click “Submit” at the bottom
After that, Autocrat will eventually (within a few hours) automatically turn it into a document, using that document you created as a template (i.e. it will create a new one just like that one … only it will have that lesson plan info you just typed into the form). If you don’t want to wait, you can always open the sheet, go to add-ons and run Autocrat, clicking the triangle “Play” button to run Autocrat and have it generate that new lesson plan document.
I hope that made sense! Feel free to reply back if you have further questions.
Hi Amanda — It depends. As far as I know, you can add others as collaborators with the share button. That gives them permission to jump into the editing side of the form and make changes. They can also make a copy from there. However, if you want people to be able to see and copy it without making changes, there’s no easy way to do that. (I would have loved to do that with this post, but the only way would have been to give anyone editing rights … and when you do that, well-meaning people change your forms all around.) Hope that helps.
Thank you so much. I have just set this up and am so jazzed to try it out.
Hi! Is there any way to share a Google form with other teachers, so they can use it?
Ok, I must say first I’m not tech savvy at all! Followed all directions (so well written) and I have a spread sheet, doc with data tags and a form with lesson plan info. on it.
How do I pull up the lesson plan form and write on it, when I pull up the one I created it does not allow me to write on it. Do I make a copy each time I write a new lesson?
A bit confused!
Thanks for any help, Lisa
That is awesome!!! Thank you. I see where I messed up. I did not click the blue arrow bar. I’m totally geeking out. This is too cool!
Hi Amanda —
Yes, this should work. I just created a form that did it. In his form for collecting walk-through data, he would need to include a question with the teacher’s email address. (Could do it as a drop-down so he would select the email, or it could be a short answer field where he’s just type that email address in.) When setting up autoCrat, when it comes to sharing the doc, you’d select “yes” … then use the light blue arrow bar on the left to select the data tag with the email address in it. You’d scroll down to the email setup below and paste that email data tag into the “To” field. The principal could write the email as he wants, and autoCrat automatically adds a link to the document at the end of the email. When autoCrat runs (either when you click the play button or when it runs automatically with a trigger), it will create the new document and automatically send an email to the teacher. Hoping that all makes sense! 🙂
Sure. You an always copy/paste, or you can click “New” > “Upload a file” and upload those Word docs to Drive as Google Docs … then when you go to open them, Google Drive can convert them to Google Docs so they can edit them.
My teachers are trying to add previously created lesson plans from Word into Google docs so they can share and edit them, can you help?
A principal wants to use a Google Form for collecting data at his Walk Through. He wants to email the teacher his/her individual results from the Form. Will autoCrat send the document automatically to each email address or will he have to go back and share the document with the teacher?
Hi Colleen (and Melissa and Lisa) — I’m updating the post above with a couple of options. Let me know if this helps, and if it doesn’t … leave another comment! We’ll get it figured out! 🙂
I was wondering the same thing. I saw that there was the option to have them on multiple documents or a single document. However, I would love to have all my plans for my one class on one doc and my plans for my other class on another doc. Is there a way to do that?
In general, I consider myself fairly tech savvy, but I had trouble with this. I have a google doc called lesson plan data tags, a google form called lesson plan template and a google sheet called lesson plans. Not sure what to do with the data tags. Having trouble editing the form. and I haven’t even tried to update the template yet….
I was thinking the same. I teach math. Can I put M-F on one document?
Okay – I followed the steps and got one document for each lesson I created. Was that supposed to happen? Is there any way to get all the documents for the same class on one page?
Excellent suggestion by Wanda here!
I suggest making sure you use this extension so that you don’t lose work while working on the form. https://chrome.google.com/webstore/detail/lazarus-form-recovery/loljledaigphbcpfhfmgopdkppkifgno?hl=en